Monday, December 5, 2016

Holiday Treats | Peppermint Marshmallow Bark

With Christmas just a few weeks away, you might be looking for a little gift you can make for friends, neighbors, teachers... Just about anyone you can think of that you just want to give a little treat to this time of year.  This Peppermint Bark is something we make every year and it's always a huge hit.  It's also super easy to make, so win-win in my book ;-) I hope you enjoy is as much as we do!


Ingredients for Chocolate Peppermint Marshmallow Bark:
Two 12oz bags of semi-sweet chocolate chips (or whichever type of chocolate you prefer) 
6 candy canes with wrappers removed 
1 cup of small marshmallows
1 large sheet of parchment paper

Saturday, December 3, 2016

Comfort Food - Turkey Chili

It has been cold here in Northern California.  I laugh as I type this, knowing very well that cold for us is a high of 58 during the day and low 40's at night, but still, for us, it's down right chilly.  Speaking of chilly... I'm sharing an oldie, but goodie here on the blog today.  My Turkey Chili recipe.  We are heading out this afternoon to have some family photos taken and I know that we will be cold and hungry when we get home this afternoon, so I thought a good slow cooker recipe would be perfect for dinner tonight.  I actually had all the ingredients on hand to make this, and you just might too!

Comfort Food


Comfort Food


Ingredients:
1 lb of lean ground turkey
1 can of black beans drained and rinsed
1 can of kidney beans drained and rinsed
2 cans of fire roasted diced tomatoes
1 onion diced
2 cloves minced garlic
1 pkg of taco seasoning (I like Trader Joe's brand)
1 pkg of ranch seasoning mix
olive oil
salt & pepper to taste

Suggested garnish toppings:
sour cream
cilantro
tortilla chips
cheddar cheese

Directions:

You can make this chili two ways, throw all the ingredients into a slow cooker and let it cook on medium all day, or if you get home from work and need to make something relatively quickly, the directions below will work just as well.

Brown turkey in a heavy bottom pot (such as a dutch oven) over medium heat with a little olive oil in the pan. Once the turkey begins to brown add the onions and garlic. Cook until the turkey is nearly cooked though, then add the taco seasoning and mix well. Add the tomatoes, beans and ranch seasoning. Simmer on medium heat for about 30 minutes to allow all the flavors to meld together. Serve in large bowls and garnish with your choice of suggested toppings.

Whether you choose the slow cooker method or the stove top method, I promise this will warm you right up and is the perfect comfort food for a cold winter day!

Friday, December 2, 2016

Holiday Home Tour 2016

I can hardly believe that it is already December and my favorite time of year is here!  The holidays are such a fun time of the year and of course I love decorating the house and tree, so I'm super excited to share what we've been up to here.  Since we are expecting a new addition shortly after Christmas, I got started on my decorating a little early this year, but I have been trying hard not to do anything over the top.  I felt the need to scale back, one for financial reasons, and two so that I wasn't putting so much pressure on myself to have everything be perfect.  I have a tendency to want things to be just so, and that can be a little stressful, so I won't be showing pictures of my kitchen on this tour today. At a later time I might get a few shots in, but for now, I'm just pleased with the way the main room of our house turned out, and I hope you'll love it too!


Christmas Decor

Welcome! We added these Ikea Hemnes shoe cabinets to the entry way a few months ago and I love them!  The kids each have their own cubbies and there's no more searching for shoes in the mornings before school.  Plus, they are fun to decorate!

Behind this book shelf is the door to the nursery. There is another entry way from the hall on the other side and I wanted to keep the kids from running through the room as a short-cut to the bathroom, so we just blocked the door and you'd never even know it was there!

Holidays, Christmas, Christmas Decor
The main room in our house is a dining/living combo.

Throw Pillow, Christmas Tree
We have to move the piano out to the garage every year to make room for the Christmas tree.  Since no one really plays, we don't miss it, but boy is it a pain to move...

Holidays
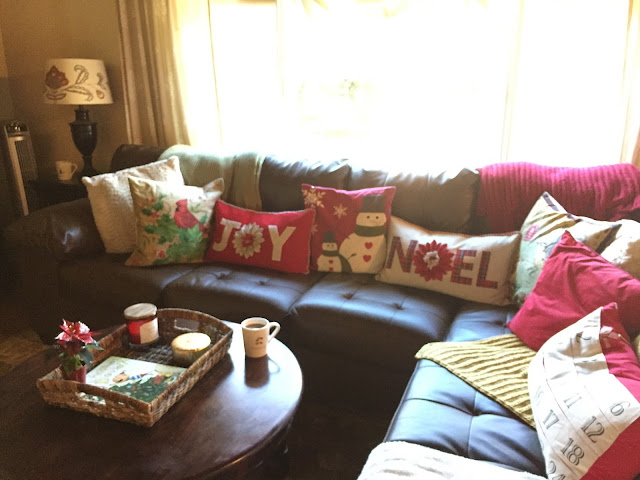
I might have a slight obsession with Christmas throw pillows... Sorry for the grainy pics, the lighting in this room is so tricky with that big window.
Do you love my new throw blankets?  They are super soft chenille and were only $9.99 each at Target on black Friday.


Christmas, Decor
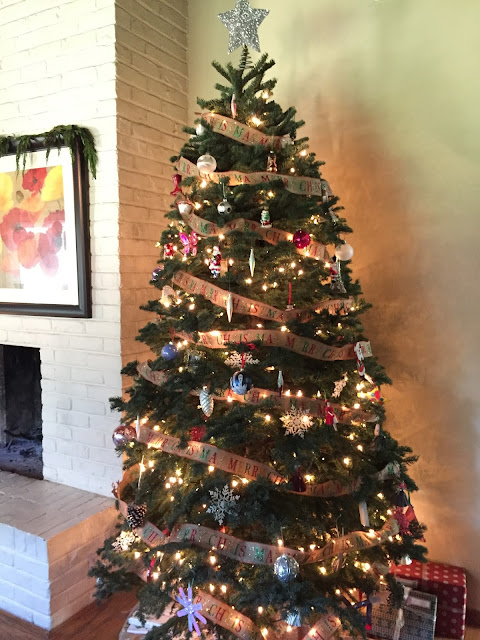
This is the first year we've had a real tree since we've lived in this house.  I'm so in love with it I'm not sure I can ever go back to fake again.  It's huge, beautiful and smells amazing!

I love this red runner.  And, so do the cats... I have to use the lint roller to remove white cat hair everyday, but it's really pretty, so I don't mind... too much.


These paper fans from T.J. Maxx are so cute and festive.  They are hard to find, but completely worth the $10 if you see them!


So, thanks for stopping by!  I hope you liked what we've done this year!

Wednesday, November 30, 2016

Seafood Macaroni & Cheese

Today I'm re-sharing one of my most popular blog post recipes ever.  The original post/dish is Langostino Macaroni & Cheese, but I was thinking today about how it would be really simple to substitute shrimp, crab, or even lobster... So I'm re-naming this post Seafood Macaroni & Cheese since langostinos are not the only option here.


Langostino Mac & Cheese

Ingredients:
1 stick of butter
1/4 cup of all purpose flour
4 1/2 cups of whole milk, heated, but not boiling
1 tbs garlic powder
1 tsp salt
pinch of nutmeg
1/2 tsp of white pepper
1 lb. elbow macaroni
2 cups of shredded sharp white cheddar cheese
2 cups of shredded Gruyere cheese
1 12oz bag of frozen langostino tails
1 cup of panko (substitute regular) breadcrumbs
(Serves 8)
Directions:
Begin by heating your water to cook your pasta.  When it comes to a boil, add the pasta and cook for about 5 minutes, drain (but keep the pasta water, you'll need it to cook the langostino tails) and set aside.  The pasta will finish cooking in the oven and you don't want it to have a mushy consistency, so it only needs to partially cook for now.
In a large sauce pan over medium heat, melt your stick of butter.  Add your flour when the butter is melted and whisk until it is combined and has the texture of wet sand.  Add garlic powder, salt, pepper and nutmeg. Cook, whisking frequently for about 2 minutes, then slowly add the warm milk, whisking continually so no lumps form.  When the sauce is smooth, continue to cook for 3-5 minutes.  This helps to cook out the starchy taste from the flour.  After several minutes, reduce the heat to low and slowly stir in the cheese, one handful at a time, until melted completely.


Using the same water that you cooked the pasta in, add the langostino tails and cook for 30 seconds to 1 minute then drain and set aside.

In a large bowl add the pasta, langostino tails, and sauce.  Stir until combined and transfer to a greased 9x13 baking dish (or two smaller dishes if you don't have one this big).  Top with the panko breadcrumbs and bake in a preheated 350 degree oven until golden brown, about 30 minutes.  Allow to cool about 15 minutes before serving.


It looks amazing, doesn't it?  I promise it tastes amazing too!

Monday, November 28, 2016

Thursday, November 10, 2016

Crowd Pleasing Lasagna

Do you have gobs of family coming into town next week?  Are you starting to meal plan and make grocery lists for Thanksgiving?  Are you looking for recipes to feed everyone?  Look no further...

The star of Thanksgiving is always the turkey and sides, but if you have guests from out of town who will be staying for a few days, after a while turkey and leftovers get a little boring.  This delicious lasagna, made with alfredo sauce, is the perfect way to feed a crowd.  Plus it's so delicious everyone will go crazy for it!


Ingredients:
1 box of no-boil lasagna noodles
1 bag of fresh baby spinach leaves
10 oz of white mushrooms sliced
1 tbs of butter
1 small yellow onion diced
2 cloves of minced garlic
2 cups of shredded mozzarella cheese
1 lb. of Italian sausage (casings removed)
1 recipe of my Alfredo Sauce ** (or jarred Alfredo if you're in a pinch)
fresh basil & parsley to garnish

Directions:
Start by browning the Italian Sausage in a non-stick skillet over medium heat.  Once it is cooked through and golden, remove sausage and allow to drain on a paper towel.  Pour excess grease into a heat-safe container and use the same pan to lightly brown your onions.  Once onions begin to soften, add garlic and fresh spinach.  Once the spinach is wilted and cooked down, remove from heat. In a separate skillet over med-low heat, add butter. Once melted add the sliced mushrooms and cook until they are golden brown.  Spray a baking dish with non-stick spray. Ladle Alfredo sauce into the bottom of the baking dish.  Add your first layer of no bake noodles.  Spoon half of the sausage, spinach and mushrooms over the noodles.  Sprinkle with 1/3 of the cheese and top with another layer of noodles.  Add another generous ladle of Alfredo and the other half of your sausage, spinach and mushrooms and top with more cheese and another layer of noodles.  Top the noodles with more Alfredo sauce and the remaining 1/3 of mozzarella cheese.  Bake in a pre-heated 350 degree oven until golden brown and bubbly, about 40 minutes. Allow to cool for about 20 mins before serving. Garnish with fresh herbs.


**
Alfredo Recipe:
4 oz. cream cheese
1/2 a stick of butter
1 1/4 cup of milk
1 cup of Parmesan cheese
2 tbs of garlic powder

Directions:
Over medium low heat melt butter. When butter is melted add cream cheese and melt for a couple minutes (it will look funny, like it is separated) add the garlic powder and slowly whisk in the milk. Continue to whisk until smooth. Add Parmesan cheese and whisk until melted. Add the sundries tomatoes and using an immersion blender blend until smooth. If sauce is too thick add a little milk. 

Tuesday, November 8, 2016

Updated Home Tour

Hey guys, hope you are all having a fantastic day! A while back I shared on my blog with you that we are expecting our third baby girl in January! We are so excited!!

The nesting phase has officially set in (it's sort of just my personality anyway!) and I have been a busy bee making changes around the house in preparation for our new arrival.

One of the biggest changes that we made over the last year was switching our daughters bedrooms around and moving our bedroom down stairs. Here is the original post, but since this was such a big change, I thought I'd talk a little more about it...

Lily Claire and Ella, now 8 and 4, had been asking to share a bedroom for a while, but although we have a 4 bedroom house, finding enough room for all the toys, book shelves,  two beds, ect. was going to be a challenge unless we gave them our bedroom.  So that's what we decided to do, and it has worked out beautifully.

There is so much more storage for all their toys and things upstairs.  We even had enough room to make one of the cupboards a craft cupboard!  It has been great having all their toys and stuff off the main floor and out of sight.  And, they love sharing a room!

I actually love having my room downstairs so much better and my husband agrees. If one of us needs to get up to let a dog out in the middle of the night it is much easier, and my husband, who is a very heavy sleeper, doesn't fall down the stairs anymore when he gets up in the middle of the night.

Since we moved downstairs, one of the sacrifices we made was giving up our master bathroom.  That hasn't been that big of a deal since the hall bath is literally just across from our bedroom, but I did give it a little update so it feels more like a grown up space.

The next big project we tackled was making a space for the baby.  Since the girls are upstairs, that left three bedrooms down stairs.  One for us, one we used as a guest bedroom and one we had set up as an office.  Well the office never got used, except to store bills and school papers, so that is the room we decided to turn into a nursery.


The space was a little tricky and I plan to do a full post with all the changes we made, hopefully next week, but here is a little sneak peak and what used to be the office.

One last change I wanted to share with you before you head out the door (metaphorically speaking) is our entry way.  With the lack of an office, and some very dedicated book lovers living here, we needed to make a new home for our book shelf.  Since the nursery had two entry ways, one being right off the front door entrance, we decided to block off that door and hide it with the book case.  It worked out perfectly and unless you have been over before, you would never know that there is a door behind it!

We also added two shoe cabinets (three girls live here, soon to be four and we love shoes!) from Ikea to the entry way and I wanted to show you those too.  These have been life changing and I can't believe we waited so long to get them.  Seriously I could write an entire post about these cabinets (and I might!).  They are narrow enough that they don't take up much room, but they store tons of shoes and they are super cute!

I hope you liked seeing all the changes we've been making around here!  Thanks for stopping by today!