Saturday, November 5, 2016

Favorite Fall Sandwich

Does anyone else get excited about turkey sandwiches this time of year???  I can't be the only one, right? I'm making a grocery list and thinking about food (big surprise, huh?) and this sandwich is on my mind.  I thought I'd share it with you again, incase you are new to the blog or haven't made it yet. And if you think you have to wait until after Thanksgiving to make it, with the leftover turkey, think again.  Many stores have prepared roasted turkey and fresh cranberry sauce on hand in the deli (I know Trader Joe's does!) and those work perfectly for this yummy sandwich.

Ingredients:
Ciabatta Rolls
Roasted Turkey sliced
Cranberry-Orange Relish
Extra Sharp White Cheddar Cheese
 
Directions:
Pre-heat your Panini press, or if you do not have one heat a skillet and have another heavy skillet or brick wrapped in aluminum foil ready.  Assemble sandwiches by slicing ciabatta rolls in half, smearing with cranberry-orange relish and adding cheese and turkey to the sandwiches.  Place in your Panini press and leave until bread his heated through and cheese is melted. If you don't have a Panini press place sandwiches in the skillet and press down with heavy bottomed pan or brick, turning over after a few minutes.   I served my sandwiches with the delicious squash soup that I blogged about yesterday.  These sandwiches are soooo good!  Did I already mention that....?

Thursday, November 3, 2016

Kitchen Countertop DIY Makeover

I am so excited to share this DIY project with you today!  It is literally (as my four year old daughter says all the time) my best DIY to date!  Here's why: it was so cheap! This new look cost less than $10.  It has made a huge difference in how my kitchen looks, and I love it!


So, here are some before shots.  I know they aren't the best quality, but you can definitely see the ugly blue formica that we have lived with for over 5 years now.  I hated it.  Really hated it.


And here are some after shots...


DIY Countertops

contact paper

SO. MUCH. BETTER!!!

How did I accomplish this look for $10? Contact paper and patience.

I saw the idea on Pinterest, but in the examples I found, everyone used rolls of peel and stick vinyl that looked like marble.  Although most of the reviews I read on Amazon were positive, I was a little hesitant to go through with the order because I wasn't sure that the white marble was the right look for my kitchen.  I was also nervous that the blue might show through, and then what would be the point? Oh, and it was a little expensive... Although not really, just about $10-15 a roll, but I would probably need 4-5 rolls and investing $50-60 in something I wasn't sure of made me a little uneasy.

So... I went on the hunt for something I could find locally.  Home Depot was very limited in their supply and I found one speckled option similar to the one I used, but it had a lot of white in it, which I didn't love.  Target had nothing, Emigh Hardware didn't have anything I liked, so I tried Walmart (I hate Walmart) as a last resort.  And I found it!  On Clearance for $4.90 a roll.  So I bought three rolls.

I only ended up needing two rolls, and I did scrap a few sections because I got frustrated and had the paper stick to itself, or crease and I wasn't able to smooth it well enough. But, I'm really glad I have the extra roll now because I can always touch a section up or even replace it if I need to.

Here is what you need for this project:
  • Contact paper (use a measuring tape to take a basic measurement ahead of time so you know how much to buy, and make sure to buy a little extra)
  • Very clean kitchen countertops
  • Room to move around
  • utility knife, scissors & credit card
  • good music
  • coffee
Here are my main tips for this project:
  • Start in a corner or section of countertop that isn't the main focus in your kitchen.  I started mine in this corner (pictured below) because it is a little darker here and harder to see imperfections, and also because I keep a lot of everyday supplies here so I knew I could hide any mistakes with a strategically placed cutting board or bowl of fruit.  
  • Work in small sections when possible.  If you cut too big of a piece and try to cover a large area all at once, it is much more difficult to smooth out bubbles and prevent creases.  Using small sections to cover the back splash area and to go around sinks or edges/corners made for a much easier application and smoother look. 
  • Have a sharp utility knife on hand and a credit card.  I put a brand new blade in my knife before I started this project, which made cuts really easy to make.  The credit card is good for smoothing air bubbles.
  • Have a ton of patience.  This can be tedious and frustrating at times.  The contact paper that I used was not very thick and therefore stretched a little if you needed to lift and re-position. 
  • Don't start this project without having several hours to devote to it, or plan to do it in steps. I have a very small amount of counter space and it still took 3-4 hours to apply.
  • Don't expect perfection.  You will miss some air bubbles and some seams may not be perfectly straight.  Try no to let this stress you out.  Remember the end result is just to cover whatever god awful formica or material you have underneath them.  It may not be perfect, but it will be so much better than before.
You can see the corner that I started in above!

The end result for me was worth the effort.  I don't know how long it will last or how it will hold up, but I will be happy to update you as time passes!  I hope I inspired you to be brave and tackle a project like this in your own house!


Monday, October 24, 2016

Meal Planning Monday

Hi Friends!  I hope you all had a fantastic weekend.  Ours was pretty low key, which is just what we needed.  Today has been a little busier though... I had a 28 week ultrasound this morning and was supposed to have a doctors appointment too, but it had to be rescheduled for later in the morning because my doctor was out sick.  Anyway, I was thinking about food while I was sitting in the waiting room for half of the morning (because I'm pregnant and always hungry!) and I was scrolling through some past recipes I've shared with you guys trying to get meal ideas for the week.  This sour cream noodle bake that I made a while back looked so good, I decided to share it again with you all today!


Rich creamy sour cream combined with cottage cheese and noodles.  Tangy tomato sauce, hearty ground beef.  Love.

Ingredients:
12 oz pkg of egg noodles
1 cup of sour cream
1 cup of cottage cheese
2 cups of shredded cheddar or jack cheese
1 can of crushed tomatoes
1 lb. lean ground beef
1 small onion diced
2 cloves of garlic minced
handful of fresh flat leaf parsley roughly chopped
1 tbs Italian seasoning
salt & pepper
Directions:
Cook noodles until al dente (according to pkg instructions minus 2 minutes). 
While noodles are cooking, in a large non-stick skillet over medium-high heat brown the ground beef.  When the beef starts to brown, add the onion, garlic and Italian seasoning.  Season with salt and pepper to taste. When the beef is cooked, add the can of crushed tomatoes, heat through and then set aside and cover.
In a large bowl combine sour cream and cottage cheese and stir well.  Add the parsley.  When the noodles are al dente, drain and add them to the bowl and stir until completely coated with sour cream mixture. Season with salt and pepper.
Spray a baking dish with non-stick spray and ladle in about hald of the noodle mixture.  Then top with half of the sauce and top with a handful of the cheese.  Repeat with the second half of the noodles and sauce and top with the remaining cheese.  Bake at 400 degrees for about 20 minutes or until the cheese is golden and bubbly.  Allow to set for about 15 minutes before serving.  Enjoy!


Monday, October 17, 2016

National Pasta Day

Creamy Bacon Chicken Pasta


In honor of national pasta day I thought I would share one of my family's most requested pasta dishes today.  Bacon. Chicken. Pasta. Yes. It is as good as it sounds.  You won't be disappointed.


I saw a recipe for a pasta similar to this on Pinterest, but I put my little spin on it, of course.  This is my version.  I hope you'll give it a try.


Ingredients:
1lb, of rigatoni or penne pasta
2 cooked chicken breasts diced or shredded (I use rotisserie chicken)
1 small onion diced
2 cloves of garlic
1 tsp dried thyme
1 pkg of mushrooms sliced (bella or white button)
4 pieces of bacon
1 cup of ricotta cheese
1/2 cup of parmesan cheese
1/2 cup of chicken broth
1/2 cup of half & half
1 oz cream cheese
4-5 large basil leaves

Directions:
Cook pasta according to pkg instructions.  While it is cooking, using kitchen shears cut small pieces of bacon into a cast iron (or non stick) skillet.  Cook bacon over medium-high heat until crispy, then remove with a slotted spoon and drain on a paper towel.  Add onions to the bacon grease and cook them over medium heat until golden, then add garlic and thyme.  After garlic softens, 1-2 minutes, add the mushrooms and cook about 5 minutes.  Add the ricotta, chicken broth, cream cheese, parmesan and half & half and stir until cream cheese melts and the sauce is smooth.  Stir in the chicken and remove from the heat. When the pasta is al dente, add to the sauce and toss until combined.  If the sauce is too thick add a little of the water  you cooked the pasta in.  Transfer to a pre-warmed pasta bowl and top with bacon and torn basil.

Bon Appetit!

Thursday, October 13, 2016

Butternut Squash Fettuccine

Everything about butternut squash feels like fall to me.  From the color to the warm flavor, I can't get enough of this perfect vegetable (or fruit?).

pasta, cheese, butternut squash

I also like pasta. And cheese.  Like really like pasta and cheese.  But, since I know that this combo can be a little rich and fattening, I came up with this lightened up version of alfredo by replacing a lot of the cream, butter and cheese with squash.  And it really works, friends.  I'm not going to say this is the healthiest food you'll ever eat, but if you want a lightened version of alfredo, love butternut squash and are craving pasta, this dish is for you!

Ingredients:
1lb. fettuccine
1 butternut squash (not too big)
1 oz of cream cheese
1/2 cup chicken broth
1/2 cup of milk
1/2 cup of grated parmesan cheese
olive oil
salt, pepper, granulated garlic
sage

Directions:
  • Preheat oven to 425 degrees.  Cut squash in half and scoop out seeds.  Drizzle with olive oil and season liberally with salt, granulated garlic & pepper.  Cook until tender, about 30 minutes.
  • When squash is tender remove from oven and put large pot of water on to boil.  Follow cooking instructions for the pasta and drain when al dente.
  • Use a spoon and scoop out the flesh of the squash and transfer to food processor.  Add chicken broth 1/4 cup of broth and milk and puree until smooth.  Increase liquids if needed up to 1/2 cup each, depending on how much squash you have, until the puree reaches the desired consistency.
  • Add the parmesan cheese to the food processor and pulse until combined, then check the seasoning and add additional salt, pepper and garlic if needed.
  • Transfer puree to a sauce pan and heat over medium low until it is hot.
  • When the pasta is cooked to al dente and is drained, transfer to a large bowl, add sauce and toss well.  Garnish with sage and additional parmesan cheese if desired.


I really hope you'll give this pasta a try and let me know what you think!  This is going in my weekly rotation this fall! 

Tuesday, October 11, 2016

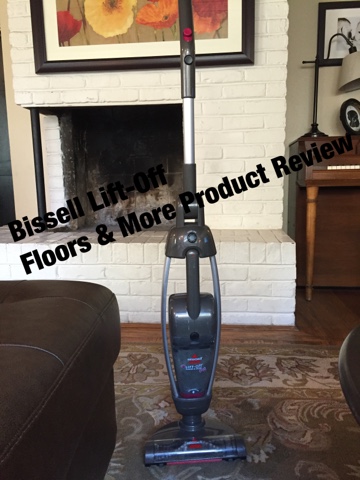
Product Review: Bissell Lift-Off Floors & More Pet

This is not my usual post.  You will not find a hidden recipe somewhere or some pictures of rooms in my house that are decorated and spotless.  This post is strictly about function and practicality and pets and kids.  Are you still with me??? Great, today I'm reviewing a product that I recently purchased because it's just too good not to share.

So, you may know from pictures, especially if you follow me on Instagram (and you should! @lilyseclaires) that I have kids and pets living at my house. These kids and pets are not mess free and shed quite a bit.


They're pretty cute, huh? But back to the messes.  The entire downstairs in our house has hardwood, tile or linoleum, which is great, but with as much hair as this gang sheds, it seems like every surface is coved in a fine layer or dog and cat hair.  Which drives me nuts!

Since I hate hauling out the big heavy vacuum and moving it from room to room and unplugging/replugging as I go, and swiffering just wasn't cutting it, I searched Amazon for a solution. One of the products that I found was the Bissell Lift-Off Floors & More Pet.  It was reasonably priced, $59.99 and had 4 stars so I decided to give it a try.  And I am SO glad I did!  You guys, this product is such a time saver and is so convenient!

It literally snapped together in two seconds, then needed to be charged overnight, and then I was good to go.
Cordless Broom
Add caption

So here is why I really love this cordless sweeper:


  • It is so light!  There is no schleping a heavy awkward vacuum around the house.  This easily lifts if I need to pick it up, and has a slim swivel head that makes it easy to get under furniture.
  • It has a brush that spins that picks pet hair up easily.  I rarely have to go back over a space to suck something up.
  • It is super easy to empty.  Just trust me on this one.
  • It is small and takes up very little closet space.
  • It holds a charge long enough for me to vacuum the entire house.
The only con I have regarding this product is the detaching hand vac does not seem to have very much power.  I don't really understand why that is, but since I rarely use it as just a hand vac this doesn't bother me much, but I do see why it only has 4 stars on Amazon because of this.

So, in conclusion, if you have pets and or kids and are looking for a cordless vacuum option, I highly recommend this product!  Do you have a cordless vacuum that you love? I'd love to hear about it if you do!

*All opinions regarding the product review of the Bissell Lift-Off Floors & More Pet are completely my own.  I was not paid or given any products by Bissell or Amazon (although if they would like me to use and review products I would be delighted to!) and used my own money to purchase this product. 


Monday, October 10, 2016

Now Booking Family Photo Sessions for Fall!

Now booking Fall Family Photo Sessions!  I have time slots available on October 23rd, 29th and November 5th, 12th and 19th.  Plan ahead for those upcoming Holiday cards!


Cost for each session is $125 and includes a 45 minute shoot and a disc with 15-30 edited images.  I have avalibility at two location sites.  To reserve your slot, please email me at heatheryamashiro@yahoo.com