Wednesday, November 30, 2016

Seafood Macaroni & Cheese

Today I'm re-sharing one of my most popular blog post recipes ever.  The original post/dish is Langostino Macaroni & Cheese, but I was thinking today about how it would be really simple to substitute shrimp, crab, or even lobster... So I'm re-naming this post Seafood Macaroni & Cheese since langostinos are not the only option here.


Langostino Mac & Cheese

Ingredients:
1 stick of butter
1/4 cup of all purpose flour
4 1/2 cups of whole milk, heated, but not boiling
1 tbs garlic powder
1 tsp salt
pinch of nutmeg
1/2 tsp of white pepper
1 lb. elbow macaroni
2 cups of shredded sharp white cheddar cheese
2 cups of shredded Gruyere cheese
1 12oz bag of frozen langostino tails
1 cup of panko (substitute regular) breadcrumbs
(Serves 8)
Directions:
Begin by heating your water to cook your pasta.  When it comes to a boil, add the pasta and cook for about 5 minutes, drain (but keep the pasta water, you'll need it to cook the langostino tails) and set aside.  The pasta will finish cooking in the oven and you don't want it to have a mushy consistency, so it only needs to partially cook for now.
In a large sauce pan over medium heat, melt your stick of butter.  Add your flour when the butter is melted and whisk until it is combined and has the texture of wet sand.  Add garlic powder, salt, pepper and nutmeg. Cook, whisking frequently for about 2 minutes, then slowly add the warm milk, whisking continually so no lumps form.  When the sauce is smooth, continue to cook for 3-5 minutes.  This helps to cook out the starchy taste from the flour.  After several minutes, reduce the heat to low and slowly stir in the cheese, one handful at a time, until melted completely.


Using the same water that you cooked the pasta in, add the langostino tails and cook for 30 seconds to 1 minute then drain and set aside.

In a large bowl add the pasta, langostino tails, and sauce.  Stir until combined and transfer to a greased 9x13 baking dish (or two smaller dishes if you don't have one this big).  Top with the panko breadcrumbs and bake in a preheated 350 degree oven until golden brown, about 30 minutes.  Allow to cool about 15 minutes before serving.


It looks amazing, doesn't it?  I promise it tastes amazing too!

Monday, November 28, 2016

Thursday, November 10, 2016

Crowd Pleasing Lasagna

Do you have gobs of family coming into town next week?  Are you starting to meal plan and make grocery lists for Thanksgiving?  Are you looking for recipes to feed everyone?  Look no further...

The star of Thanksgiving is always the turkey and sides, but if you have guests from out of town who will be staying for a few days, after a while turkey and leftovers get a little boring.  This delicious lasagna, made with alfredo sauce, is the perfect way to feed a crowd.  Plus it's so delicious everyone will go crazy for it!


Ingredients:
1 box of no-boil lasagna noodles
1 bag of fresh baby spinach leaves
10 oz of white mushrooms sliced
1 tbs of butter
1 small yellow onion diced
2 cloves of minced garlic
2 cups of shredded mozzarella cheese
1 lb. of Italian sausage (casings removed)
1 recipe of my Alfredo Sauce ** (or jarred Alfredo if you're in a pinch)
fresh basil & parsley to garnish

Directions:
Start by browning the Italian Sausage in a non-stick skillet over medium heat.  Once it is cooked through and golden, remove sausage and allow to drain on a paper towel.  Pour excess grease into a heat-safe container and use the same pan to lightly brown your onions.  Once onions begin to soften, add garlic and fresh spinach.  Once the spinach is wilted and cooked down, remove from heat. In a separate skillet over med-low heat, add butter. Once melted add the sliced mushrooms and cook until they are golden brown.  Spray a baking dish with non-stick spray. Ladle Alfredo sauce into the bottom of the baking dish.  Add your first layer of no bake noodles.  Spoon half of the sausage, spinach and mushrooms over the noodles.  Sprinkle with 1/3 of the cheese and top with another layer of noodles.  Add another generous ladle of Alfredo and the other half of your sausage, spinach and mushrooms and top with more cheese and another layer of noodles.  Top the noodles with more Alfredo sauce and the remaining 1/3 of mozzarella cheese.  Bake in a pre-heated 350 degree oven until golden brown and bubbly, about 40 minutes. Allow to cool for about 20 mins before serving. Garnish with fresh herbs.


**
Alfredo Recipe:
4 oz. cream cheese
1/2 a stick of butter
1 1/4 cup of milk
1 cup of Parmesan cheese
2 tbs of garlic powder

Directions:
Over medium low heat melt butter. When butter is melted add cream cheese and melt for a couple minutes (it will look funny, like it is separated) add the garlic powder and slowly whisk in the milk. Continue to whisk until smooth. Add Parmesan cheese and whisk until melted. Add the sundries tomatoes and using an immersion blender blend until smooth. If sauce is too thick add a little milk. 

Tuesday, November 8, 2016

Updated Home Tour

Hey guys, hope you are all having a fantastic day! A while back I shared on my blog with you that we are expecting our third baby girl in January! We are so excited!!

The nesting phase has officially set in (it's sort of just my personality anyway!) and I have been a busy bee making changes around the house in preparation for our new arrival.

One of the biggest changes that we made over the last year was switching our daughters bedrooms around and moving our bedroom down stairs. Here is the original post, but since this was such a big change, I thought I'd talk a little more about it...

Lily Claire and Ella, now 8 and 4, had been asking to share a bedroom for a while, but although we have a 4 bedroom house, finding enough room for all the toys, book shelves,  two beds, ect. was going to be a challenge unless we gave them our bedroom.  So that's what we decided to do, and it has worked out beautifully.

There is so much more storage for all their toys and things upstairs.  We even had enough room to make one of the cupboards a craft cupboard!  It has been great having all their toys and stuff off the main floor and out of sight.  And, they love sharing a room!

I actually love having my room downstairs so much better and my husband agrees. If one of us needs to get up to let a dog out in the middle of the night it is much easier, and my husband, who is a very heavy sleeper, doesn't fall down the stairs anymore when he gets up in the middle of the night.

Since we moved downstairs, one of the sacrifices we made was giving up our master bathroom.  That hasn't been that big of a deal since the hall bath is literally just across from our bedroom, but I did give it a little update so it feels more like a grown up space.

The next big project we tackled was making a space for the baby.  Since the girls are upstairs, that left three bedrooms down stairs.  One for us, one we used as a guest bedroom and one we had set up as an office.  Well the office never got used, except to store bills and school papers, so that is the room we decided to turn into a nursery.


The space was a little tricky and I plan to do a full post with all the changes we made, hopefully next week, but here is a little sneak peak and what used to be the office.

One last change I wanted to share with you before you head out the door (metaphorically speaking) is our entry way.  With the lack of an office, and some very dedicated book lovers living here, we needed to make a new home for our book shelf.  Since the nursery had two entry ways, one being right off the front door entrance, we decided to block off that door and hide it with the book case.  It worked out perfectly and unless you have been over before, you would never know that there is a door behind it!

We also added two shoe cabinets (three girls live here, soon to be four and we love shoes!) from Ikea to the entry way and I wanted to show you those too.  These have been life changing and I can't believe we waited so long to get them.  Seriously I could write an entire post about these cabinets (and I might!).  They are narrow enough that they don't take up much room, but they store tons of shoes and they are super cute!

I hope you liked seeing all the changes we've been making around here!  Thanks for stopping by today!

Saturday, November 5, 2016

Favorite Fall Sandwich

Does anyone else get excited about turkey sandwiches this time of year???  I can't be the only one, right? I'm making a grocery list and thinking about food (big surprise, huh?) and this sandwich is on my mind.  I thought I'd share it with you again, incase you are new to the blog or haven't made it yet. And if you think you have to wait until after Thanksgiving to make it, with the leftover turkey, think again.  Many stores have prepared roasted turkey and fresh cranberry sauce on hand in the deli (I know Trader Joe's does!) and those work perfectly for this yummy sandwich.

Ingredients:
Ciabatta Rolls
Roasted Turkey sliced
Cranberry-Orange Relish
Extra Sharp White Cheddar Cheese
 
Directions:
Pre-heat your Panini press, or if you do not have one heat a skillet and have another heavy skillet or brick wrapped in aluminum foil ready.  Assemble sandwiches by slicing ciabatta rolls in half, smearing with cranberry-orange relish and adding cheese and turkey to the sandwiches.  Place in your Panini press and leave until bread his heated through and cheese is melted. If you don't have a Panini press place sandwiches in the skillet and press down with heavy bottomed pan or brick, turning over after a few minutes.   I served my sandwiches with the delicious squash soup that I blogged about yesterday.  These sandwiches are soooo good!  Did I already mention that....?

Thursday, November 3, 2016

Kitchen Countertop DIY Makeover

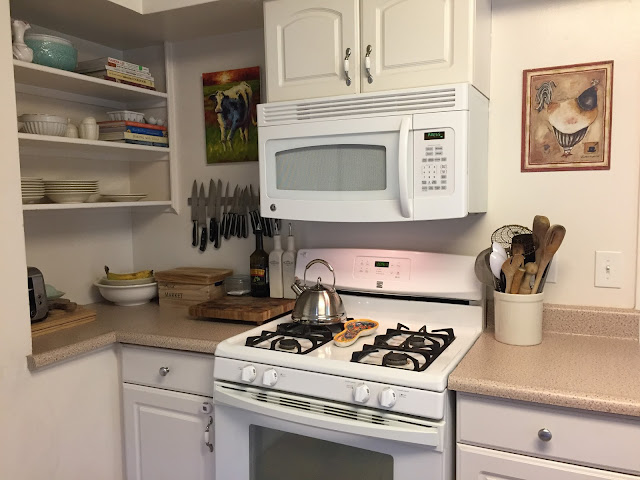
I am so excited to share this DIY project with you today!  It is literally (as my four year old daughter says all the time) my best DIY to date!  Here's why: it was so cheap! This new look cost less than $10.  It has made a huge difference in how my kitchen looks, and I love it!


So, here are some before shots.  I know they aren't the best quality, but you can definitely see the ugly blue formica that we have lived with for over 5 years now.  I hated it.  Really hated it.


And here are some after shots...


DIY Countertops

contact paper

SO. MUCH. BETTER!!!

How did I accomplish this look for $10? Contact paper and patience.

I saw the idea on Pinterest, but in the examples I found, everyone used rolls of peel and stick vinyl that looked like marble.  Although most of the reviews I read on Amazon were positive, I was a little hesitant to go through with the order because I wasn't sure that the white marble was the right look for my kitchen.  I was also nervous that the blue might show through, and then what would be the point? Oh, and it was a little expensive... Although not really, just about $10-15 a roll, but I would probably need 4-5 rolls and investing $50-60 in something I wasn't sure of made me a little uneasy.

So... I went on the hunt for something I could find locally.  Home Depot was very limited in their supply and I found one speckled option similar to the one I used, but it had a lot of white in it, which I didn't love.  Target had nothing, Emigh Hardware didn't have anything I liked, so I tried Walmart (I hate Walmart) as a last resort.  And I found it!  On Clearance for $4.90 a roll.  So I bought three rolls.

I only ended up needing two rolls, and I did scrap a few sections because I got frustrated and had the paper stick to itself, or crease and I wasn't able to smooth it well enough. But, I'm really glad I have the extra roll now because I can always touch a section up or even replace it if I need to.

Here is what you need for this project:
  • Contact paper (use a measuring tape to take a basic measurement ahead of time so you know how much to buy, and make sure to buy a little extra)
  • Very clean kitchen countertops
  • Room to move around
  • utility knife, scissors & credit card
  • good music
  • coffee
Here are my main tips for this project:
  • Start in a corner or section of countertop that isn't the main focus in your kitchen.  I started mine in this corner (pictured below) because it is a little darker here and harder to see imperfections, and also because I keep a lot of everyday supplies here so I knew I could hide any mistakes with a strategically placed cutting board or bowl of fruit.  
  • Work in small sections when possible.  If you cut too big of a piece and try to cover a large area all at once, it is much more difficult to smooth out bubbles and prevent creases.  Using small sections to cover the back splash area and to go around sinks or edges/corners made for a much easier application and smoother look. 
  • Have a sharp utility knife on hand and a credit card.  I put a brand new blade in my knife before I started this project, which made cuts really easy to make.  The credit card is good for smoothing air bubbles.
  • Have a ton of patience.  This can be tedious and frustrating at times.  The contact paper that I used was not very thick and therefore stretched a little if you needed to lift and re-position. 
  • Don't start this project without having several hours to devote to it, or plan to do it in steps. I have a very small amount of counter space and it still took 3-4 hours to apply.
  • Don't expect perfection.  You will miss some air bubbles and some seams may not be perfectly straight.  Try no to let this stress you out.  Remember the end result is just to cover whatever god awful formica or material you have underneath them.  It may not be perfect, but it will be so much better than before.
You can see the corner that I started in above!

The end result for me was worth the effort.  I don't know how long it will last or how it will hold up, but I will be happy to update you as time passes!  I hope I inspired you to be brave and tackle a project like this in your own house!